Wireless Screen Sharing
Quick Reference Guide
What is Wireless Screen Sharing
Accessing Wireless Screen Sharing
Getting Started – On Screen Instructions
Getting Started – iOS Using AirPlay (Recommended)
Getting Started – iOS Using the App
Getting Started – macOS Using AirPlay (Recommended)
Getting Started – macOS Using the App
Getting Started – Android Using Miracast
Getting Started – Android Using the App (Recommended)
Getting Started – Windows Using Connect (Miracast)
Getting Started – Windows Using the App (Recommended)
Getting Started – Other Devices
What is Wireless Screen Sharing
Wireless screen sharing allows showing the contents from your phone, tablet, or laptop screen on another larger display (monitor or projector) without any cables. This means no special connectors or dongles are needed and you can present with any device. With our WAVPODs (Wireless Audio Video Pods) multiple people can connect and screen share at the same time for more ways to collaborate.
Accessing Wireless Screen Sharing
Most Classrooms, some study spaces, and even some digital signage monitors are equipped with a WAVPOD device that is capable of wireless screen sharing. In the classroom this option can be selected by choosing ‘Guest Device’ on the control touch panel. For study spaces select the ‘Laptop’ or ‘A2‘ icon button.
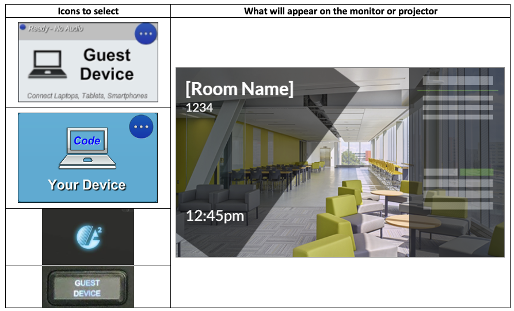
For compatible digital signage displays playing HTV, look out for a black bar across the bottom with an IP Address and 4-digit Screen Key passcode.
These displays are around campus and are free for staff or students to use anytime to display their content on the big screen. When you are done sharing content and disconnect, the display will resume playing HumberTV content.
Compatible Devices
Almost any mobile device with WiFi and web browsing will work. If your device is not listed try using ‘Other’.
|
Device |
iOS |
MacOS |
Android |
Windows |
Other |
|
Examples |
Apple iPhones, iPads, and iPods |
MacBook, MacBook Air, and MacBook Pro |
Google, Samsung, Sony, LG, Huawei, OnePlus, and more phones and tablets |
Microsoft laptops, and Surface tablets |
Chromebook, and Linux |
|
Using |
|||||
|
Using the App |
N/A |
||||
|
Requirements |
iOS versions 13, and up |
macOS Catalina, Big Sur |
Android versions 10, and up |
Windows 8, 10 |
|
Built-In Sharing vs the App
|
Built-In Sharing Features |
App Features |
|
|
Getting Started – On Screen Instructions
Wi-Fi must be connected to eduroam using username@humber.ca
Present by connecting the HDMI cable or Wirelessly using these instructions:
- In your web browser go to: --->
http://[CAMPUS LETTER]-[BUILDING AND ROOM NUMBER]-WAVPOD - Click the "Join" button to install Solstice.
- Launch the app and follow its instructions.
- Use Screen Key [4-digit number] to connect.
* Apple, Android, or Windows users can also directly AirPlay or Miracast to: --->
http://[CAMPUS LETTER]-[BUILDING AND ROOM NUMBER]-WAVPOD
Further Details
- You cannot use the Guest WiFi network. Only eduroam or Infrastructure Domain Wireless
- These instructions work for any compatible device for time users. Once the app is downloaded only steps 3&4 are needed.
- A browser takes you anywhere on the internet (Safari, Edge, Chrome, Firefox, ect).
- North Campus Letter is N, Lakeshore Campus Letter is L.
- An example of a http Hostname URL for North Campus, building H, room 235:
http://N-H235-WAVPOD - For IGS no campus letter is required in the http Hostname URL, eg http://IGS401-WAVPOD).
- Alternatively, the IP address (seen at the top of the screen consisting of 4 sets of numbers starting with 10.116) can also be used instead of the http Hostname URL.
- The Join button should automatically detect your device and either download the correct application (for laptops) or send you to your App Store to download the Mersive Solstice App for your device (phones and tablets). The app is free.
- If the app is already downloaded it will automatically open. If it had to download for the first time you may have to repeat steps 1&2 or just open the newly installed app directly.
- The 4-digit passcode will enlarge while trying to connect. You can also find it underneath the room name or on the bottom footer next to the IP address.
- Multiple users can connect and share at the same time. Even users connecting with HDMI can join the screen with users connecting wirelessly.
Getting Started – iOS Using AirPlay (Recommended)
- Connect to the Humber Wi-Fi network (eduroam or Infrastructure Domain Wireless).
- Ensure Bluetooth is on.
- Open Control Center:
- On iPhone X or later or iPad with iPadOS 13 or later: Swipe down from the upper-right corner of the screen.
- On iPhone 8 or earlier or iOS 11 or earlier: Swipe up from the bottom edge of the screen.
- Tap Screen Mirroring
 .
. - Select the desired room WAVPOD from the list.
- Enter the 4-digit passcode that appears on the screen.
Getting Started – iOS Using the App
- Connect to the Humber Wi-Fi network (eduroam or Infrastructure Domain Wireless).
-
Download and open the app.

-
Enter the 4-digit passcode that appears on the screen in the ‘Quick Connect’ bar.
OR Select the desired room WAVPOD from the list and enter the 4-digit passcode that appears on the screen.
* To Screen Mirror, follow Steps 3-6 from ‘Getting Started – iOS Using AirPlay’
Getting Started – macOS Using AirPlay (Recommended)
- Connect to the Humber Wi-Fi network (eduroam or Infrastructure Domain Wireless).
- Ensure Bluetooth is on.
- Click on the AirPlay icon
 in the corner menu bar.
 - Select the desired room WAVPOD from the list.
- Enter the 4-digit passcode that appears on the screen.
Getting Started – macOS Using the App
- Connect to the Humber Wi-Fi network (eduroam or Infrastructure Domain Wireless).
- Download and open the app
-
Enter the 4-digit passcode that appears on the screen in the ‘Quick Connect’ bar.
OR Select the desired room WAVPOD from the list and enter the 4-digit passcode that appears on the screen.
NOTE: Getting a black screen? Check your Mac privacy settings. Open the Apple menu, then choose System Preferences. From there, click Security & Privacy, then open the Privacy tab. Here you can see all the permission categories. Click on any of the entries on the left side to see which apps have requested and been given permission. You may need to modify Screen Recording and Microphone permissions to allow the Solstice App and related items. Check that the Solstice App has been approved by selecting the checkbox “App Store and identified developers”. You may have to “click the lock” and enter your credentials to make these changes. Your Mac may also need to restart after applying these settings.
Getting Started – Android Using Miracast
- Connect to the Humber Wi-Fi network (eduroam or Infrastructure Domain Wireless).
- Swipe down from the top of the screen to open the Notification Panel.
- Select the toggle that says ‘Screen Sharing’, ‘Wireless Projection’, ‘Miracast’, ‘Smart View’, ‘Screen Cast’ or something along that (you may need to expand the Notification Panel to view more options).
- Select the desired room WAVPOD from the list.
- Enter the 4-digit passcode that appears on the screen.
Getting Started – Android Using the App (Recommended)
- Connect to the Humber Wi-Fi network (eduroam or Infrastructure Domain Wireless).
- Download and open the app

-
Enter the 4-digit passcode that appears on the screen in the ‘Quick Connect’ bar.
OR Select the desired room WAVPOD from the list and enter the 4-digit passcode that appears on the screen.
Getting Started – Windows Using Connect (Miracast)
- Connect to the Humber Wi-Fi network (eduroam or Infrastructure Domain Wireless).
- Press Windows key (
 )+ K to open the ‘Connect’ menu.
 - Select the desired room WAVPOD from the list.
- Enter the 4-digit passcode that appears on the screen.
Getting Started – Windows Using the App (Recommended)
- Connect to the Humber Wi-Fi network (eduroam or Infrastructure Domain Wireless).
- Download and open the app
-
Enter the 4-digit passcode that appears on the screen in the ‘Quick Connect’ bar.
OR Select the desired room WAVPOD from the list and enter the 4-digit passcode that appears on the screen.
Getting Started – Other Devices
- Connect to the Humber Wi-Fi network (eduroam or Infrastructure Domain Wireless).
- Open a web browser (Chrome, Firefox, ect) and enter the IP address on screen. The IP address will be 4 sets of numbers starting with 10.116. You can also use the Hostname which will be:
http://[CAMPUS LETTER]-[BUILDING AND ROOM NUMBER]-WAVPOD - Click on the ‘Launch in Browser’ button.
- Enter the 4-digit passcode that appears on the screen and enter your name.
- Click on ‘Launch’.
- Select what you want to mirror and select ‘Share’.
Help & Support
Please contact the I.T. Support Centre if you experience any issues.
Phone: 1 (416) 675-6622 ext. 8888
Web Chat: https://humber.ca/techtalk
Campus Location: I.T. Support Centre - A212 (Lakeshore) or Tech Zone – H109 (North) or Tech Zone – IGS508 (International Graduate School)
This page was created for easy use on a mobile device. The AODA version is available at: Screen Sharing (humber.ca)