Navigate to Microsoft365 and click on the OneDrive icon. OneDrive is part of the cloud-based, Microsoft 365 subscription Humber uses, and is your storage space. Humber staff are allocated 1 terabyte of space.
OneDrive on the Desktop
Windows 10 syncs your OneDrive online with the OneDrive folder on your PC. Access it by opening your File Explorer. Click on the icon OneDrive – Humber College on the left side navigation pane of your File Explorer. The folders and files will have a slightly different look than the online version, but all your documents will be available.
*You will need an internet connection to open a file with the ‘online’ status.
Sharing and Collaborating
One of the huge advantages of using OneDrive is the sharing/collaborating aspect. No longer do you need to email documents to colleagues to engage their input and deal with multiple files named as different versions. You can easily share a file or folder with other Humber staff or guests, and everyone can be working on the same file – even at the same time!
There are multiple ways of sharing. You can click the share icon wherever it appears or in an app, or with the share button. Regardless of how you share, the Send Link window will launch:
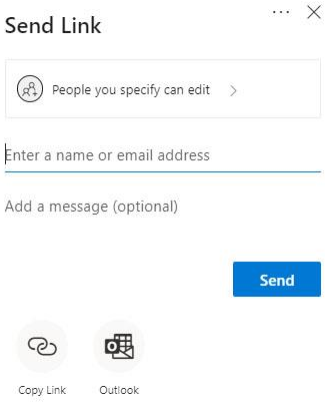
Start typing the name of the person. Since it is connected with active directory, you can just click on their name once it appears. By default, OneDrive will assume that you want the person you are sharing with to be able to edit the document you are sharing. If you are sharing with someone outside of Humber, or if you do NOT want to allow them to edit the document, you will need to click on the arrow beside ‘People you specify can edit’.
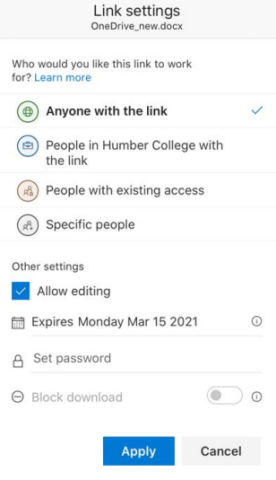
Choose the settings that best meet your needs. If you want to share the document as ‘read only’ ensure that the Allow editing is unchecked. If you want to share the document for only a certain amount of time, use the ‘expiry date’ option. If you want to password protect the document, set a password here. When you are satisfied with your settings, click ‘Apply’. When you have finished adding all the people you want to share with, click on Send.
An email notification will be sent to the recipients advising them that you have shared a document with them and will allow them to open the file. Depending on your notification settings, you may receive a notification advising you that the person you shared the document with has opened the file. When you are collaborating with others, the document will show who is also editing with coloured flags for each person. You will be able to see, in real time, others in the file.

Managing your file sharing can be viewed by clicking on the show action (3 vertical dots) beside the file name. The Manage Access window will open. Click on the More options and the people who have access to the file will be listed below the owner info. Click on Stop sharing to end their access to your file. If you need to change permissions from being editable, to read only, it is best to stop sharing and re-share the document with the settings you want.
Version History
Using the version history is easy. Just navigate to the file you want to restore or view a previous version and click on the show actions icon (3 vertical dots) and then select Version history. The Version History window shows the date of the previous revisions, who it was modified by, and the size of the previous revision. The number under the Version column is a link to that version of the file.