Layout
Use the myRemoteAccess.humber.ca portal to securely connect to tightly controlled corporate resources from off campus. The myRemoteAccess webpage gives you tools such as VPN connection, and connecting to a remote computer.
Remote access required multi-factor authentication (MFA). It is a process where you are challenged for an additional form of identification, such as a code sent to your phone, before being granted access to log onto a Humber webpage. If you only use a password to authenticate, it leaves the possibility of a hack more likely, as some passwords are not very secure, or can be compromised. Using multi-factor authentication increases the security since it will be harder for a hacker to compromise a password AND a mobile device. You will need to have your account added to the MFA group before you will be able to do the set up. Once you have received notification that you have been added to the group, you can follow the steps before. You will need your computer AND your mobile device.
Please Note: The portal (myRemoteAccess.humber.ca) supports all modern browsers (Chrome, Edge, etc.) and, except for remote desktop functionality, does not require an on-campus (target) computer to work.
Getting Started
Before connecting, you will need to set up Multi-Factor Authentication. You can get instructions on MFA at Multi-Factor Authentication Guide.
Connecting
If you are logging onto an application that uses MFA on your computer or phone, a window will appear asking for you to approve the sign in request. A notification will be sent to your phone. Open the Microsoft Authenticator app and approve the request.
Establishing a connection is quick and easy.
- Launch a browser and navigate to: myRemoteAccess.humber.ca and then log in using your Humber credentials (username@humber.ca and password).
- Whatever method you selected when you set up your MFA, you will automatically receive an alert. Click the Approve button to confirm your identity and complete the login process. If you have a different method selected, your alert may be different.
- Proceed with Accessing Resources instructions (next page).
Accessing VPN Resources
Corporate resources accessible by default through the myRemoteAccess.humber.ca portal include.
- Intranet (VPN)
- Connect to a computer
Additional resources can be added on a case-by-case basis by contacting the I.T. Support Centre. To remote to your on-campus computer, you will first need to connect to the VPN resource.
IMPORTANT: If you have not been provisioned with access to a corporate resource, you will not be able to access it through myRemoteAccess.
To access VPN:
- Connect to myRemoteAccess portal using the defined login procedure.
- After logging in, the Endpoint Inspection window will open. If you have not previously installed the software, click Download and allow the installation of the f5epi_setup.exe file. Once it is finished, select the link Click here in the Endpoint Inspection window (the same window you used for the download). Ensure you do not have a dialogue window open and waiting for your response behind another window.
- Click on the resource Intranet (VPN). The Network Access window may open. It looks very similar to the previous step, but you are downloading a different file. Click Download and allow the installation of the f5vpn_setup.exe file. Once it is finished, select the link Click here in the Network Access window and open the F5 Networks VPN.
Not seeing a resource you need? Please contact the I.T. Support Centre to have a controlled resource added to your profile.
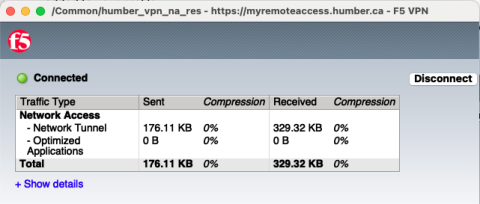
- When connected, you may see a table with connectivity traffic information and be asked to allow F5 to make changes on your device. Click Yes. Ensure you do not close this window by clicking the ‘x’ in the top-left of the window with connectivity traffic, as that will end your VPN session the same way clicking the ‘Disconnect’ will end the session.
IMPORTANT: For security reasons, the portal is set to automatically sever links to Humber after a period of inactivity (approximately 15-20 minutes).
Remoting to On-Campus Computer
- After you have successfully connected to VPN, type ‘remote desktop’ in the search bar on the taskbar of your computer and a list of results will appear.
- Click Remote Desktop Connection, in the Best match area to open the Remote Desktop Connection window.
- In the Remote Desktop Connection window, type the IP address or the name of the windows device that you want to connect to and then click Connect.
- You may have a message stating that the remote computer could not be authenticated due to problems with its security certificate. Click Yes to connect anyway.
- Humber’s Acceptable Use Policy will open. Click OK.
- Then enter your username and password for the computer you are connecting to. When you are finished using the Remote Desktop Connection, close the app by clicking the X button on the top of the window, then clicking OK. The remote session is disconnected.
Disconnecting
Be sure to log out after each session. To log out, click the portal’s Logout button and then close the browser window.