Introduction
This document will expand upon the more advanced features of the Teams Classroom technology touched upon in the Flexible Teaching Guide.
Monitor Controls
Within your Teams classroom, you will have the following monitors at your disposal:
- Projector with a screen at the front of the classroom
- Rear confidence monitor at the back of the classroom
The Teams touch panel acts as the primary control to use these monitors in a Teams Classroom setting. When you join a Teams meeting, you will find the following screen.

Layout Options
Within the screen, click on the grid icon in the bottom left corner to change the meeting layout.
Show Chat
To view the text chat in your Teams meeting, select the Chat bubble icon at the bottom of the Teams panel. A blue line underneath the icon indicates that the chat is active and visible. Select the icon again to turn off the chat view.
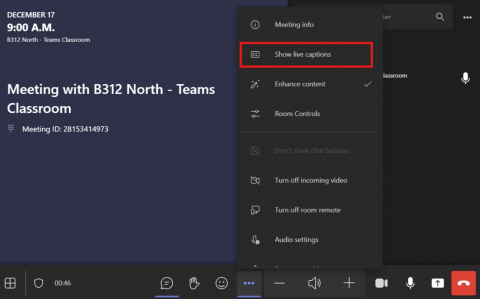
Live Captions
The option to add live closed captioning within the Teams meeting is made possible via the “three dots” menu along the bottom bar of the Teams panel. Simply press the button and select the Show live captions option within the pop-up.
Camera Controls
Depending on the size of the space, your classroom will be equipped with the following:
- Instructor facing camera
- Audience facing camera
The cameras are equipped with static presets and the option for more advanced controls. To explore these
options, press the Camera Controls button at the bottom of the podium PC.
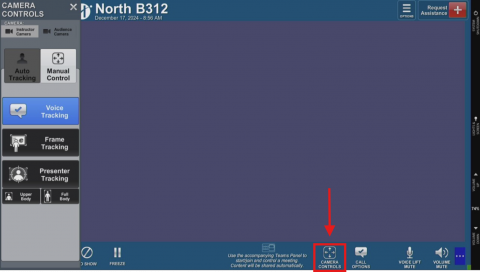
You will have the following options available to you under Instructor Camera:
- Voice Tracking
- Frame Tracking
- Presenter Tracking
- Manual Control
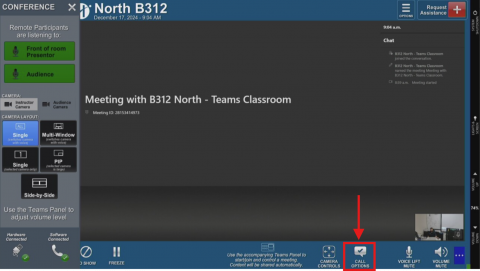
Voice tracking will allow camera views to swap between presenter and audience during question periods within
the Teams meeting by default. Frame Tracking captures a larger area in front of the classroom with less focus
on small movements. Presenter Tracking offers zoomed-in options, focusing either on the full body or upper
body of the presenter. Manual Control of the camera allows for a static camera angle to be configured via a
track wheel on the screen. Additional layout modification options are accessible by selecting the Call Options
located at the bottom right of the podium PC.
Audio Controls
To manage the audio within the room, press the Call Options button. You can then control the audio separately
for both the instructor and the audience by selecting either Front of room Presenter or Audience from the left
navigation bar. When the button is illuminated green, it indicates that the microphone is on.
Light Controls
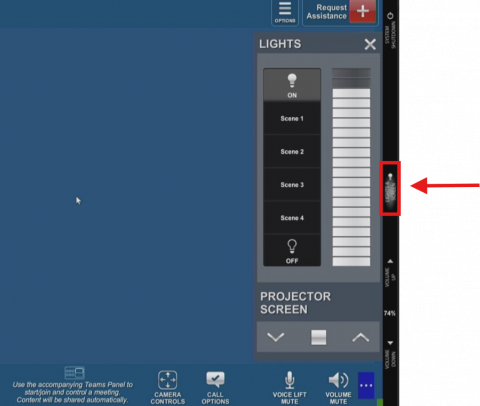
To manage the lights within the room, click on the Lights & Screen icon located on the far-right black bezel.
The various scene options offer different lighting settings for the room.
Requesting Assistance
- To request assistance, press the Request Assistance button on the top right corner of the podium PC and
choose the type of your request. - This will generate a ticket and notify the technicians, and the assigned technician will come to your classroom
promptly. Response time may vary based on volume of tickets, but classroom requests are prioritized. - Alternatively, you can use your personal mobile device to scan the QR code in the room to request assistance
which will also generate a ticket that will notify our technicians.